Working with 3D Presets
Applying a 3D preset to selected image data lets you quickly apply groups of 3D settings, scene's views properties, and lighting effects to improve the visualization of 3D renderings.
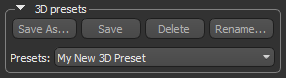
The options for applying, creating, and renaming 3D presets are available in the 3D presets box on the Data Properties and Settings panel, as shown below.
3D presets
The default 3D presets available in the drop-down menu are optimized for specific materials, such as bone, organic tissue, solids, concrete, plastics, and metals.
- Select the required image data in the Data Properties and Settings panel.
- Select the 3D view in the current scene.
- Choose a preset in the Presets drop-down menu.
You can create your own 3D presets for particular materials or data samples that include groups of 3D settings, LUTs, scene's views properties, and lighting effects.
- View your dataset in 3D.
- Apply the default 3D preset that best highlights your sample type, recommended.
- Do the following, as required:
- Apply the 3D settings that are best suited to the material properties of your dataset (see 3D Settings).
- Select the scene's view properties, such as Maximize quality, that are best suited for your visualization needs (see Settings for 3D Scene Views).
- Choose and adjust the lighting effects that are best suited to enhance visualizations of your dataset (see Lighting Properties).
- Choose a LUT in the Window Leveling panel that is best suited for your visualization needs.
- Click the Save As button in the 3D presets box.
- Do the following in the Choose the preset name dialog:
- Select the All users or Current user only option, as required.
- Enter a name for your 3D preset.
- Click the Save button.

Your new 3D preset will now be available in the 3D preset box.
Note You can edit user-defined 3D presets, as well as rename and delete them (see Editing 3D Presets).
If required, you can edit user-defined 3D presets, as well as rename and delete them.
- Apply the 3D preset that you want to edit to a dataset that best highlights the sample type, recommended.
- Do the following, as required:
- Adjust the 3D settings (see 3D Settings).
- Adjust the scene's view properties (see Settings for 3D Scene Views).
- Adjust the lighting effects (see Lighting Properties).
- Choose another LUT in the Window Leveling panel.
- Do one of the following:
- Click the Save button to overwrite the selected 3D preset.
- Click the Save As button to save a variation of the selected 3D preset.
Note You can also delete and rename user-defined 3D presets.
